Halloween is a time for spooky fun and creativity, and what better way to celebrate than with this fun class favor: a mini Make-A-Monster playdough sensory kit. This non-food class treat combines playdough, pipe cleaners, googly eyes, pom poms, and even vampire teeth to create a sensory experience that’s monstrously entertaining. Below, I’ll share how to assemble these kits for your little ghouls and goblins.
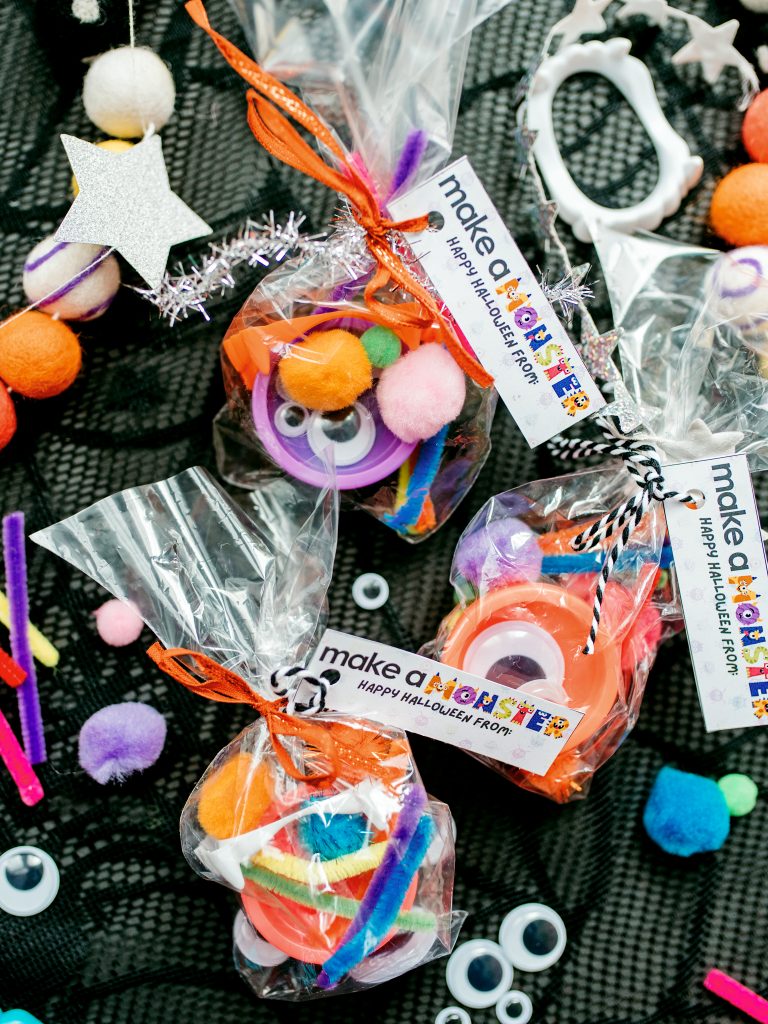

Get the Free Printable Tags HERE!
What You’ll Need:
- Playdough: The perfect way to create adorable or terrifying monsters of any shape! This party pack bag was perfect for these class favors.
- Pipe Cleaners: These flexible, colorful sticks allow kids to craft arms, legs, and other creature features for their monsters. They’re great for adding a touch of whimsy to the creations.
- Googly Eyes: Googly eyes bring your monsters to life. They’re a must-have for making your creations look both silly and spooky.
- Pom Poms: Soft and tactile, pom poms make excellent additions for monster hair, ears, or even a dash of color. Available in different sizes and colors, they’re perfect for customizing your little critters.
- Vampire Teeth: These colorful Halloween-themed teeth provide the finishing touch to your spooky creations. Kids can use them to make their monsters look fierce or add a quirky twist.
Assembling the Make-A-Monster Sensory Kits:
Creating these kits is super easy, making them an excellent option for class favors or Halloween party treats. It’s a great activity for your kids to help put together! You can check out how I made them on Instagram, here. Follow these steps to assemble your own Make-A-Monster Sensory Kits:
Step 1: Gather Your Supplies
Before you start assembling the kits, make sure you have enough playdough, pipe cleaners, googly eyes, pom poms, and vampire teeth for the number of kits you want to create. I found this affordable bulk pack that is the perfect size!
Step 2: Prepare the Packaging
Choose small, clear plastic bags or containers for your sensory kits. You can find Halloween-themed bags or simply use clear ones with Halloween-themed labels. You may also want to include an instruction card inside each kit to explain how to use the materials.
Step 3: Divide the Materials
Divide the playdough, pipe cleaners, googly eyes, pom poms, and vampire teeth into equal portions. Depending on your budget, you can include more or fewer items in each kit. Aim for a balanced mix of colors and shapes to encourage creativity.
Step 4: Assemble the Kits
Carefully place each portion of materials into the plastic bags or containers. If you’re using containers, secure them with a lid or plastic wrap. Seal the bags or containers with a twist tie, ribbon, or Halloween-themed sticker to keep everything organized and visually appealing.
Step 5: Personalize Your Kits
Consider adding a label with a Halloween message, a cute monster illustration, or a “Make-A-Monster Sensory Kit” title to make each kit extra special.
Benefits of the Make-A-Monster Sensory Kit:
- Encourages Creativity: These kits provide an opportunity for kids to use their imaginations, fostering creativity and artistic expression.
- Sensory Play: Assembling and playing with the materials in the kit helps develop sensory and fine motor skills.
- Halloween-Themed Fun: These class favors embrace the Halloween spirit, making them a hit at any October gathering.
- Easy to Share: Since the kits are individually packaged, they’re perfect for sharing and exchanging with friends.
The Make-A-Monster Sensory Kit is a fantastic way to engage kids in Halloween festivities while promoting creativity and sensory development. Whether you’re handing them out at a class party, a trick-or-treating alternative, or just as a special Halloween gift, these kits are sure to bring monstrous delight to all who receive them. Let the monster-making fun begin!



What do you think?